Berps Developer Guides: Simple Trading Bot in TypeScript
See the full GitHub Project Code Repository
In this developer guide, we'll walk through the process of creating a trading bot that utilizes Bollinger Bands and Pyth price feeds to make trading decisions on Berps, on the Berachain network. This tutorial illustrates basic principles of triggering on-chain transactions based on externally obtained "real-world" data.
By the end of the tutorial, you will have created a bot that will automatically execute the following on Berps:
- LONG when the spot price goes below the lower Bollinger Band; and
- SHORT when the spot price goes above the upper Bollinger Band.
Requirements
Before beginning, make sure you have the following installed and setup:
- NMV or Node
v20.11.0or greater - Wallet with testnet
$HONEYtokens - See the Berachain Testnet Faucet, receive$BERAand trade for$HONEYon BEX
Trading Bot Project Setup
- Start by creating a new project folder:
mkdir berps-bot;
cd berps-bot;- Initialize a new Node.js project:
# FROM ./berps-bot

pnpm init -y;- Install the necessary dependencies:
# FROM ./berps-bot

pnpm add @pythnetwork/pyth-evm-js dotenv ethers lodash typescript;

pnpm add -D @types/lodash tslib;- Create
.envfile:
# FROM ./berps-bot

touch .env;
Populate environment variables (current environment variables are for testnet and will change depending on your environment):
File: .env
PYTH_ENDPOINT=https://hermes.pyth.network
PRICE_ID=0xff61491a931112ddf1bd8147cd1b641375f79f5825126d665480874634fd0ace
USDC_PRICE_ID=0xeaa020c61cc479712813461ce153894a96a6c00b21ed0cfc2798d1f9a9e9c94a
DATA_INTERVAL=5
BOLLINGER_PERIOD=20
BOLLINGER_MULTIPLIER=2
ENTRYPOINT_CONTRACT_ADDRESS=0xb3395EeeA7701E0037bBC6Ab52953C6fB0c3326c
PRIVATE_KEY=YOUR_WALLET_PRIVATE_KEY
RPC_PROVIDER=https://bartio.rpc.berachain.com/
Replace PRIVATE_KEY with your actual wallet private key.
The PRICE_ID represents the Pyth Price Feed ID (under "EVM Stable"). The default shown here represents the ETH/USD price feed.
The various configuration options are described in detail below.
Implement Trading Bot
There are a number of files we will have to create. Let's go over the general purpose of each of them for some high-level context:
config.ts- imports the configuration from your environment variables into a TypeScript Objectindex.ts- entry point for running the botbb.ts- logic to calculate Bollinger Bands (BBs) from a sample of price datapyth.ts- functions for interacting with Pyth SDK for fetching pricestradingBot.ts- logic for monitoring prices, calculating BBs from prices, assessing trade criteria and executing trades
Now let's get started!
1. Create File Structure
Create an src folder:
# FROM ./berps-bot

mkdir src;
Add the following file structure within src (empty files are fine for now):
# FROM ./berps-bot

├── src
│   └── ABIs
│       └── erc20.json
│       └── entrypoint.json
│   └── bb.ts
│   └── config.ts
│   └── index.ts
│   └── pyth.ts
│   └── tradingBot.ts
2. Import Contract ABIs & Config
In src/ABIs/erc20.json, copy and paste the interface from this gist.
In src/ABIs/entrypoint.json, copy and paste the interface from this gist.
In src/config.ts, add the following code:
import dotenv from "dotenv";
dotenv.config();

export const CONFIG = {
  PYTH_ENDPOINT: process.env.PYTH_ENDPOINT || "https://hermes.pyth.network",
  PRICE_ID: process.env.PRICE_ID || "",
  USDC_PRICE_ID: process.env.USDC_PRICE_ID || "",
  DATA_INTERVAL: parseFloat(process.env.DATA_INTERVAL || "5"),
  BOLLINGER_PERIOD: parseFloat(process.env.BOLLINGER_PERIOD || "20"),
  BOLLINGER_MULTIPLIER: parseFloat(process.env.BOLLINGER_MULTIPLIER || "2"),
  ENTRYPOINT_CONTRACT_ADDRESS: process.env.ENTRYPOINT_CONTRACT_ADDRESS || "",
  PRIVATE_KEY: process.env.PRIVATE_KEY || "",
  RPC_PROVIDER: process.env.RPC_PROVIDER || "",
};
3. Create the Entry Point
Open src/index.ts and add the following code:
import { TradingBot } from "./tradingBot";

async function main() {
  const tradingBot = new TradingBot();
  await tradingBot.start();

  process.on("SIGINT", async () => {
    await tradingBot.stop();
    process.exit(0);
  });
}

main().catch((error) => {
  console.error("Error:", error);
  process.exit(1);
});
index.ts is the entry point to our bot. It instantiates a new instance of TradingBot, and starts it. Nothing too fancy here - the heavy lifting is done in the sections below.
4. Create Bollinger Band Logic
Open bb.ts and add the following code:
export function calculateBollingerBands(
  prices: number[],
  period: number,
  multiplier: number
) {
  const sma = calculateSMA(prices, period);
  const stdDev = calculateStdDev(prices, period);
  const upperBand = sma + multiplier * stdDev;
  const lowerBand = sma - multiplier * stdDev;

  return { upperBand, lowerBand };
}

function calculateSMA(prices: number[], period: number): number {
  const sum = prices.slice(-period).reduce((acc, price) => acc + price, 0);
  return sum / period;
}

function calculateStdDev(prices: number[], period: number): number {
  const sma = calculateSMA(prices, period);
  const sum = prices
    .slice(-period)
    .reduce((acc, price) => acc + Math.pow(price - sma, 2), 0);
  return Math.sqrt(sum / period);
}
Based on an array of prices passed in, calculateBollingerBands will calculate an upperBand and lowerBand to inform our trade signal. If you already understand BBs or don't feel the need to learn about how they're calculated, feel free to proceed to the next section.
Bollinger Band Basics
Bollinger Bands provide an upper and lower band around the current price as shown in this example:
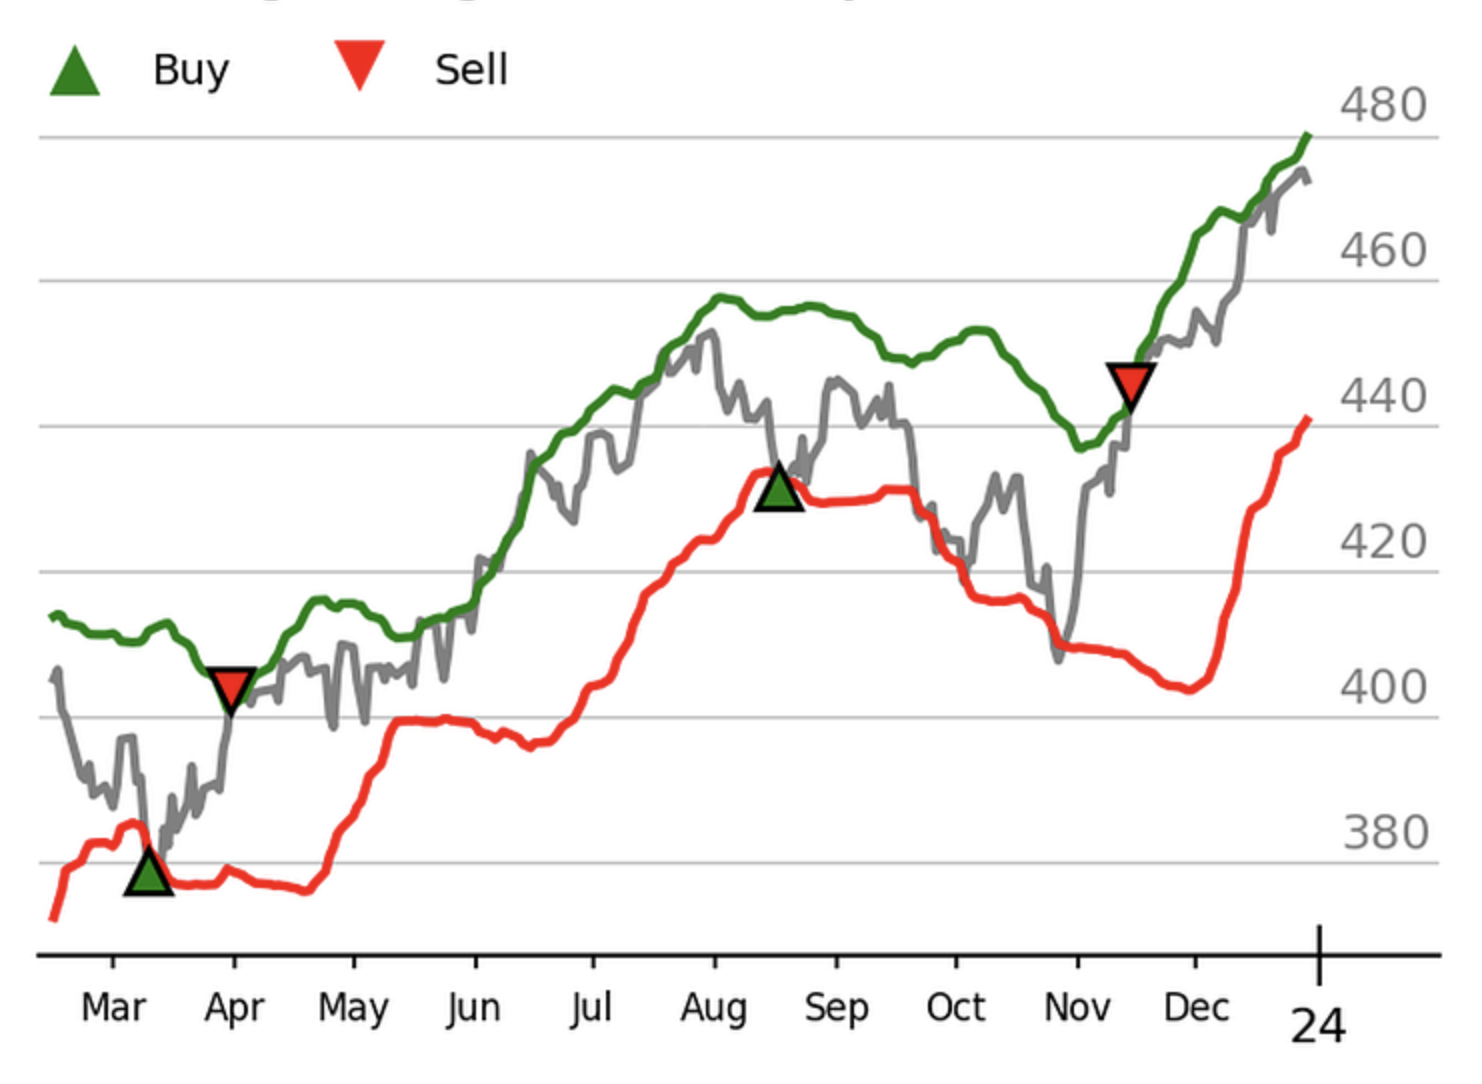
The basic idea behind a BB strategy is that when the price moves above the price moves above the upper band, it suggests overbought conditions, and to consider selling. Conversely, when the price moves below the lower band, it suggests oversold conditions and to consider buying.
BB Calculations
First, a simple moving average (SMA) is constructed from the average of a set of recent prices, or "period". The period is typically 20 (BOLLINGER_PERIOD in .env). The standard deviation is then used to determine the distance of the upper and lower bands from the SMA (BOLLINGER_MULTIPLIER in .env).
5. Get Pyth Price feeds
Open src/pyth.ts and add the following code:
import { EvmPriceServiceConnection, PriceFeed } from "@pythnetwork/pyth-evm-js";
import { CONFIG } from "./config";

export class PythConnection {
  private connection: EvmPriceServiceConnection;

  constructor() {
    this.connection = new EvmPriceServiceConnection(CONFIG.PYTH_ENDPOINT, {
      // logger: console, // Uncomment this line to enable logging
    });
  }

  async getHistoricalPriceFeeds(
    priceId: string,
    intervalSeconds: number,
    periods: number
  ): Promise<number[]> {
    const endTime = Math.floor(Date.now() / 1000 - 5);
    const startTime = endTime - (periods + 1) * intervalSeconds;
    const prices: number[] = [];

    for (
      let publishTime = startTime;
      publishTime <= endTime;
      publishTime += intervalSeconds
    ) {
      const priceFeed = await this.connection.getPriceFeed(
        priceId,
        publishTime
      );
      prices.push(this.normalizeToTenDec(priceFeed));
    }
    return prices;
  }

  async subscribePriceFeedUpdates(
    priceIds: string[],
    callback: (priceFeed: PriceFeed) => void
  ): Promise<void> {
    await this.connection.subscribePriceFeedUpdates(priceIds, callback);
  }

  async getPriceUpdateData(priceIds: string[]): Promise<string[]> {
    const priceUpdates = await this.connection.getPriceFeedsUpdateData(
      priceIds
    );

    return priceUpdates;
  }

  async unsubscribePriceFeedUpdates(priceIds: string[]): Promise<void> {
    await this.connection.unsubscribePriceFeedUpdates(priceIds);
  }

  // Express price as a number with 10 decimal precision
  normalizeToTenDec(priceFeed: PriceFeed): number {
    const priceObj = priceFeed.getPriceUnchecked();
    const { price, expo } = priceObj;
    return parseFloat(price) * Math.pow(10, 10 + expo);
  }
}
We leverage the Pyth Oracle SDK to accomplish two main objectives:
- Fetch historical prices in
getHistoricalPriceFeeds. This is run during bot initialization to construct the initial SMA. The interval at which prices are sampled is defined inDATA_INTERVALin.env - Subscribe to real-time price updates in
subscribePriceFeedUpdates
Prices are normalized to 10 decimal precision as that is the standard for how Berps treats prices.
6. Implement Trading Logic
Whew, that was a lot of set-up! Now it's time for the main course where we put everything together and implement the trading logic. In src/tradingBot.ts, we will be adding code in parts and going over its purpose.
First, we import dependencies and define constants:
import { ethers } from "ethers";
import { throttle } from "lodash";

import { PythConnection } from "./pyth";
import { calculateBollingerBands } from "./bb";
import { CONFIG } from "./config";
import EntrypointABI from "./ABIs/entrypoint.json";
import Erc20ABI from "./ABIs/ERC20.json";

const HONEY = "0x0E4aaF1351de4c0264C5c7056Ef3777b41BD8e03";
Next, we define the TradingBot class, its variables, and its constructor. The constructor initializes the PythConnection, sets up the Ethereum provider and wallet, and creates instances of the trading contract and HONEY token contract using their respective ABIs and addresses.
// ... (dependencies and constants)

export class TradingBot {

  private tradingContract: ethers.Contract;
  private honeyContract: ethers.Contract;
  private wallet: ethers.Wallet;
  private pythConnection: PythConnection;
  private prices: number[] = [];
  private lastTrade: "buy" | "sell" | null = null;

  constructor() {

    this.pythConnection = new PythConnection();
    const provider = new ethers.JsonRpcProvider(CONFIG.RPC_PROVIDER);
    const wallet = new ethers.Wallet(CONFIG.PRIVATE_KEY, provider);
    this.wallet = wallet;
    this.tradingContract = new ethers.Contract(
      CONFIG.ENTRYPOINT_CONTRACT_ADDRESS,
      EntrypointABI,
      wallet
    );
    this.honeyContract = new ethers.Contract(HONEY, Erc20ABI, wallet);
  }

  // ... (rest of the class implementation)
}
Next, we construct the start() method, responsible for initializing the trading bot. It first checks the allowance of the HONEY token for the orders contract and approves an allowance if necessary.
We then fetch historical price feeds, storing it within the prices array. A subscription to real-time price updates is made, and on update, we add to the prices array and call the checkTrade method (below) to evaluate trading conditions. Price updates are throttled based on the DATA_INTERVAL configuration to limit the frequency of updates.
export class TradingBot {
// ... (variables and constructor)
async start() {
console.log("Trading bot started");
The stop() method stops the trading bot and unsubscribes from Pyth price updates:
export class TradingBot {
  // ... (variables and constructor)

  async start() {
    // ...
  }


  async stop() {
    console.log("Trading bot stopped.");
    await this.pythConnection.unsubscribePriceFeedUpdates([CONFIG.PRICE_ID]);
  }

  // ... (rest of the class implementation)
}
The checkTrade() method is the core logic of the trading bot, checking BB signals for placing trades. It does so in the following steps:
- Check for pending transactions wth
checkPendingTx. Skip the trade if true - Calculate the BBs using
calculateBollingerBandsfrombbmodule, using updated - Retrieve the current price and determine whether buy/sell conditions are met based on the calculated bands
- Construct the trade parameters, including the trader address, pair index, position size, open price, buy/sell flag, leverage, and optional take profit (TP) and stop loss (SL) values. See the
Entrypoint.solinterface for details on these parameters - If there is a sell signal and the last trade was not a sell, it executes a sell trade by calling the
openTrademethod on theEntrypointcontract with the trade parameters. Similarly, a buy trade is made if a buy signal is triggered
export class TradingBot {
// ... (rest of the class implementation)
async stop() {
// ...
}
private async checkTrade() {
try {
const pendingTx = await this.checkPendingTx();
if (pendingTx) {
console.log("Pending transaction, skipping trade");
return;
}
Lastly, we implement a helper function checkPendingTx to avoid conflicts with any pending transactions.
export class TradingBot {
// ... (rest of the class implementation)
async checkTrade() {
// ...
}
async checkPendingTx() {
const [currNonce, pendingNonce] = await Promise.all([
this.wallet.getNonce(),
this.wallet.getNonce("pending"),
]);
Running the Bot
Execute the following command to start the bot:
# FROM: ./berps-bot

ts-node src/index.ts;
Congratulations! You just made an automated Berps trading bot. Example script output alongside the Berps UI (showing the executed trades) is shown below:
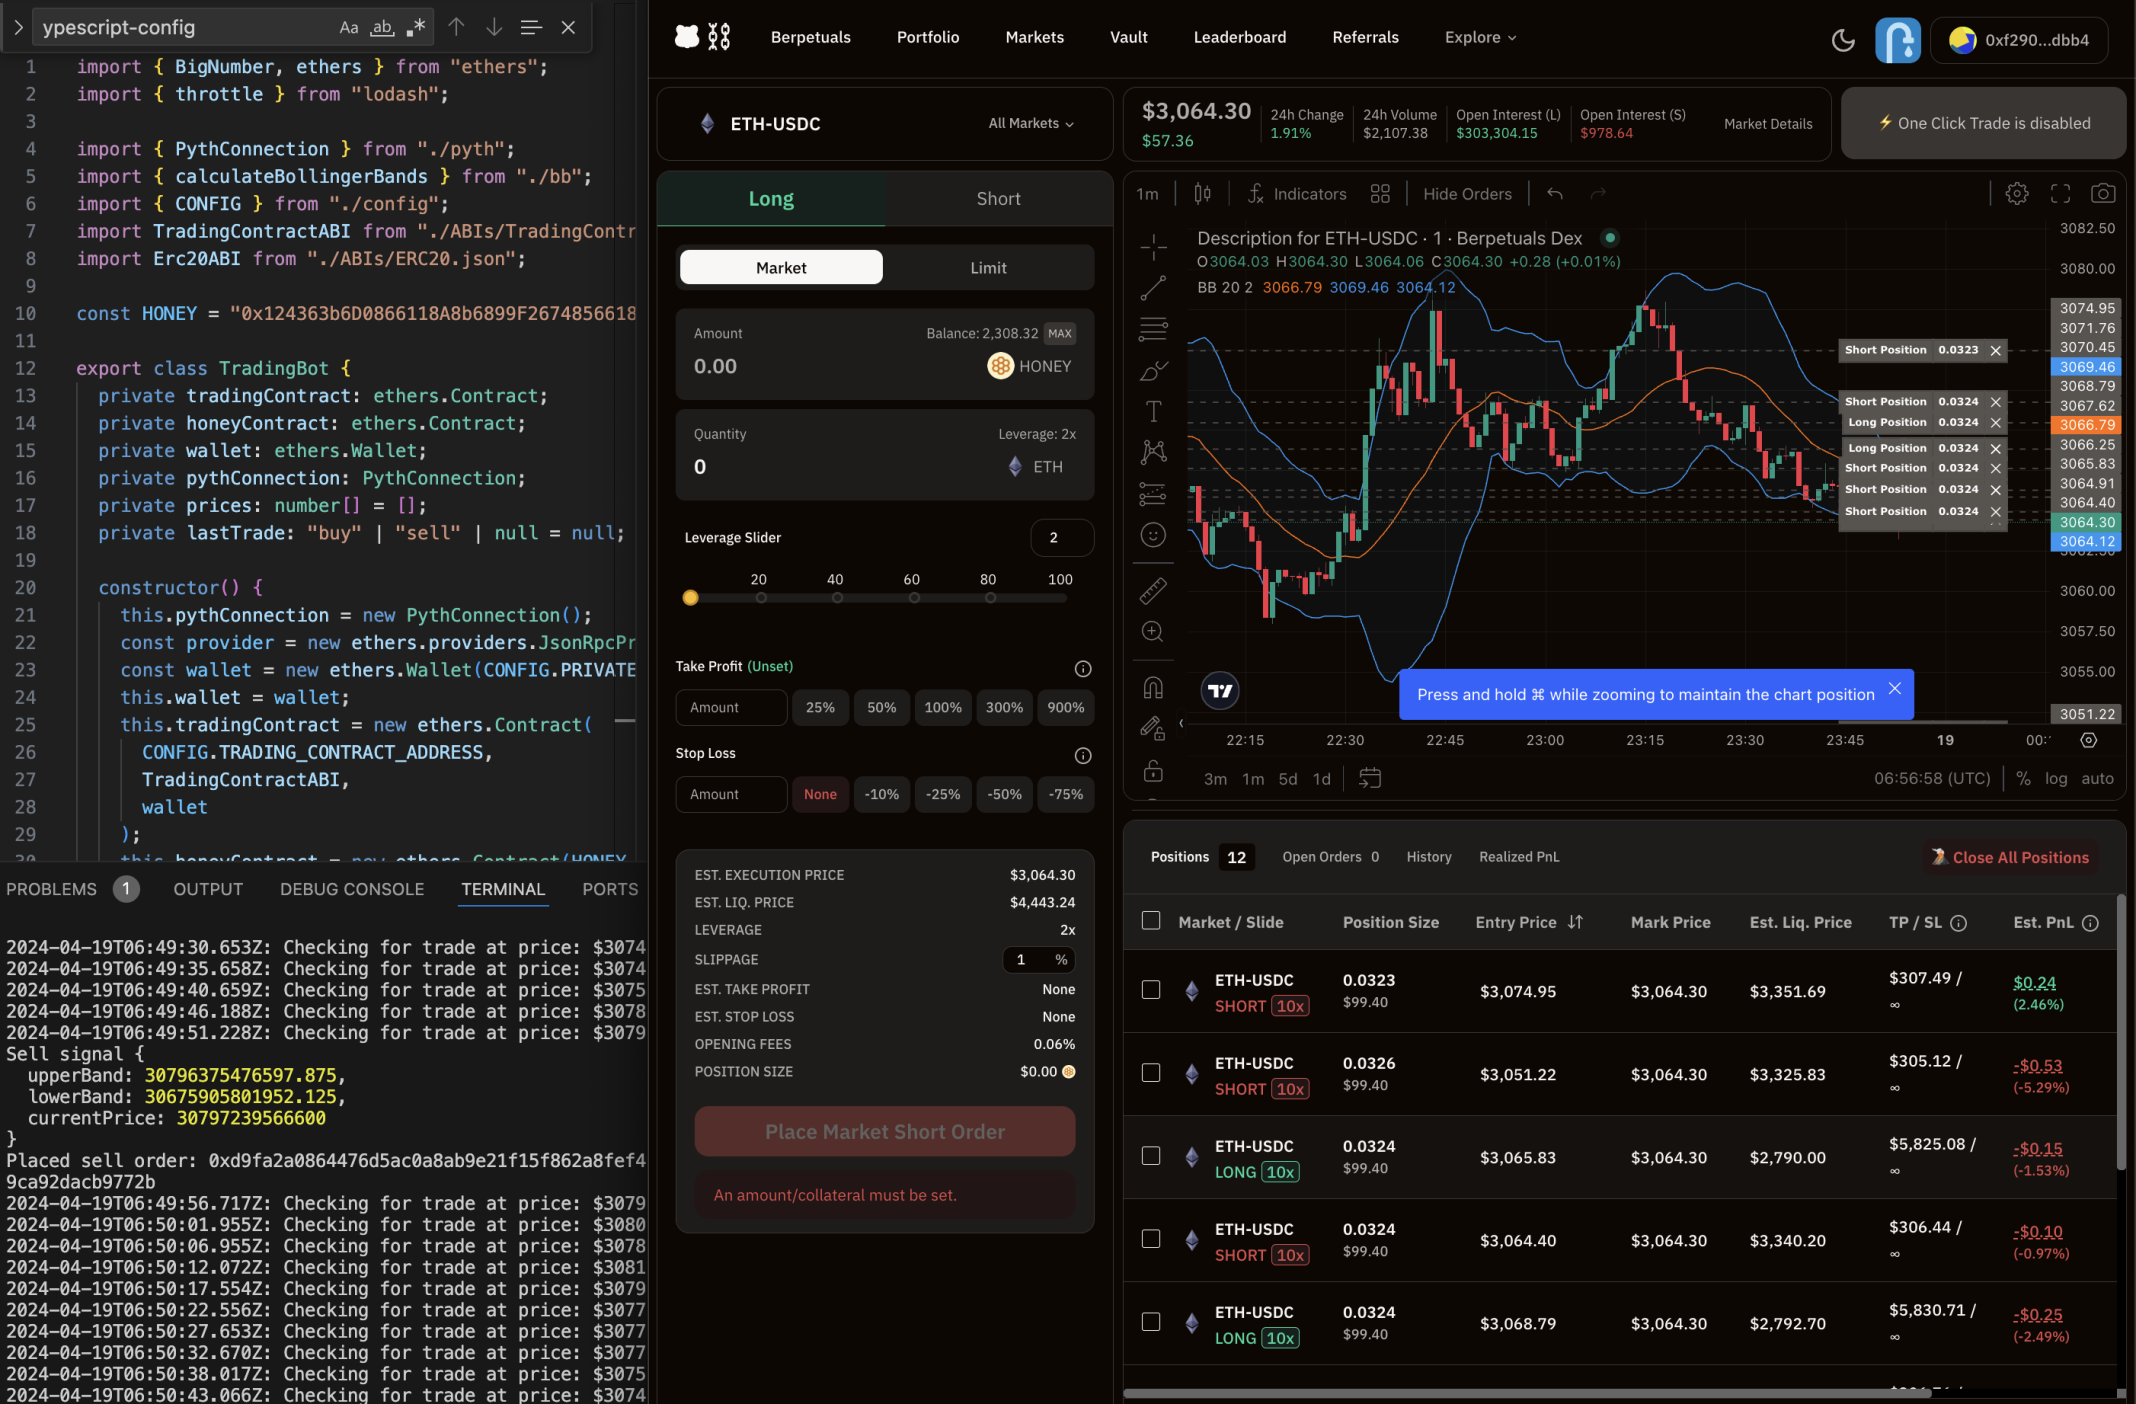
Caveats
Code samples provided herein are not suited for any use in production environments and are provided for educational purposes only.
The trades made on Berps in the example bot will increase in number as time goes on. This is because Berps does not provide cross-margin trading, and all trades are fully isolated positions. This means that traders will have to close multiple positions themselves when finished with the bot (as written). A more sophisticated bot would consider whether existing positions exist and act on those before opening any new positions.